EiffelWeb
Nav: Workbook :: Handling Requests: Form/Query Parameter
EWF basic service
Table of Contents
EWF service structure
The following code describes the basic structure of an EWF basic service that handles HTTP requests. We will need to define a Service Launcher and a Request Execution implementation.
class
    APPLICATION

inherit
    WSF_DEFAULT_SERVICE [APPLICATION_EXECUTION]

create
    make_and_launch

end
The class APPLICATION inherit from
WSF_DEFAULT_SERVICE [G ->WSF_EXECUTION create make end] it will be responsible to launch the service and set optional options.
The class APPLICATION_EXECUTION is an implementation of WSF_EXECUTION interface, which is instantiated for each incoming request.
class
    APPLICATION_EXECUTION

inherit
    WSF_EXECUTION

create
    make

feature -- Basic operations

   execute (req: WSF_REQUEST; res: WSF_RESPONSE)
        do
            -- To read incoming HTTP request, we need to use `req'

            -- May require talking to databases or other services.

            -- To send a response we need to setup, the status code and
            -- the response headers and the content we want to send out our client
        end
end
When using the standalone connector (or the deprecated “nino” connector), by default the service listens on port 80, but often this port is already used by other applications, so it is recommended to use another port.
To define another port, redefine the feature initialize and set up a new port number using the service options (see below).
class
    APPLICATION

inherit
    WSF_DEFAULT_SERVICE [APPLICATION_EXECUTION]
    	redefine
			initialize
		end

create
    make_and_launch

feature {NONE} -- Initialization

	initialize
			-- Initialize current service.
		do
			set_service_option ("port", 9090)
		end
end
Learn more about the Standalone connector.
The WSF_REQUEST gives access to the incoming data; the class provides features to get information such as request method, form data, query parameters, uploaded files, HTTP request headers, and hostname of the client among others.
The WSF_RESPONSE provides features to define the response with information such as HTTP status codes (10x,20x, 30x, 40x, and 50x), response headers (Content-Type, Content-Length, etc.) and obviously the body of the message itself.
APPLICATION is the root class of our example, it launches the application, using the corresponding connector, Which connector? this depends how do you want to run it cgi, fcgi, standalone. For development is recommended to use a standalone web server written in Eiffel, and run the execution within the EiffelStudio debugger. For production fcgi (or cgi) using Apache or another popular web server.

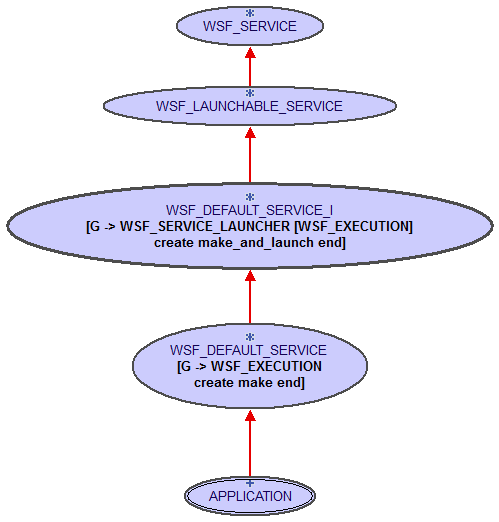
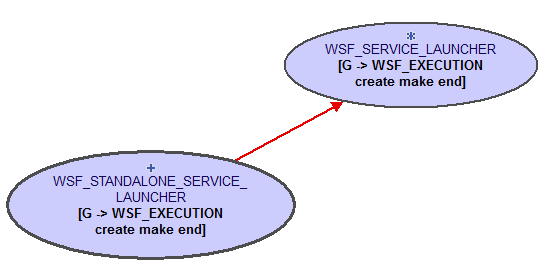
WS_LAUNCHABLE_SERVICE inherit from WS_SERVICE class, which is a marker interface in EWF. And also provides a way to launch our application using different kind of connectors. The class WSF_DEFAULT_SERVICE_I, inherit from WS_LAUNCHABLE_SERVICE and has a formal generic that should conform to WSF_SERVICE_LAUNCHER [WSF_EXECUTION]. Below a BON diagram showing one of the possible options.

Other connectors:
WSF_STANDALONE_SERVICE_LAUNCHER
WSF_CGI_SERVICE_LAUNCHER
WSF_LIBFCGI_SERVICE_LAUNCHER
A basic EWF service inherits from WSF_DEFAULT_SERVICE, which has a formal generic that should conform to WSF_EXECUTION class with a make creation procedure, in our case the class APPLICATION_EXECUTION.
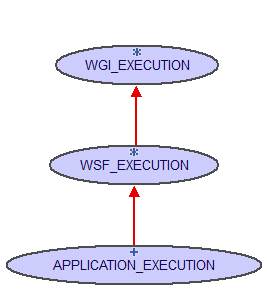
The APPLICATION_EXECUTION class inherits from WSF_EXECUTION interface, which is instantiated for each incoming request. WSF_EXECUTION inherit from WGI_EXECUTION which is the low level entry point in EWF, handling each incoming request with a single procedure execute (req: WSF_REQUEST; res: WSF_RESPONSE) ....
In the APPLICATION_EXECUTION class class you will need to implement the execute feature, get data from the request req and write the response in res.

The WSF_EXECUTION instance, in this case APPLICATION_EXECUTION is created per request, with two main attributes request: WSF_REQUEST and response: WSF_RESPONSE.
A simple Service to Generate Plain Text.
Before to continue, it is recommended to review the getting started guided. In the example we will only shows the implementation of the WSF_EXECUTION interface.
class
	APPLICATION_EXECUTION

inherit
	WSF_EXECUTION

create
	make

feature -- Basic operations

	execute
			-- Execute the incomming request
		do
				-- To send a response we need to setup, the status code and
				-- the response headers.
			response.put_header ({HTTP_STATUS_CODE}.ok, <<["Content-Type", "text/plain"], ["Content-Length", "11"]>>)
			response.put_string ("Hello World")
		end
end
Source code
The source code is available on Github. You can get it by running the command:
git clone https://github.com/EiffelWebFramework/ewf.git
The example of simple service that generate plain text response is located in the directory $PATH/ewf/doc/workbook/basics/simple, where $PATH is where you run git clone .
Just double click on the simple.ecf file and select the simple_standalone target or if you prefer the command line, run the command:
estudio -config simple.ecf -target simple_standalone
A Service to Generate HTML.
To generate HTML, it’s needed
- Change the Content-Type : “text/html”
- Build an HTML page
class
	APPLICATION_EXECUTION

inherit
	WSF_EXECUTION

create
	make

feature -- Basic operations

	execute
			-- Execute the incomming request
		do
				-- To send a response we need to setup, the status code and
				-- the response headers.
			response.put_header ({HTTP_STATUS_CODE}.ok, <<["Content-Type", "text/html"], ["Content-Length", web_page.count.out]>>)
			response.put_string (web_page)
		end

	web_page: STRING = "[
	<!DOCTYPE html>
	<html>
		<head>
			<title>Resume</title>
		</head>
		<body>
			Hello World
		</body>
	</html>
]"

end
Source code
The source code is available on Github. You can get it by running the command:
git clone https://github.com/EiffelWebFramework/ewf.git
The example of the service that generates HTML is located in the directory $PATH/ewf/doc/workbook/basics/simple_html, where $PATH is where you run git clone .
Just double click on the simple_html.ecf file and select the simple_html_standalone target or if you prefer the command line, run the command:
estudio -config simple_html.ecf -target simple_html_standalone
Nav: Workbook :: Handling Requests: Form/Query Parameter